Showing posts with label Quilts for Kids. Show all posts

Saturday, October 17, 2020

Making do with what you have on hand

As much as I love the Civil War reproduction fabrics, I really wanted to shift gears and work with some brighter, cheerful colors.  I remembered I had bought some fabric samples at my local quilt shop's SuperBowl Sunday sale:

These 3 sample cards were all from the same fabric line, and so they worked well together. The cards measure about 12 X 15", so  there was actually a lot of fabric on them.  Taking the one on the far right and spreading it out, there was all this:

Although not juvenile prints, I thought they would make a nice donation quilt for Quilts for Kids.  So, I played around with EQ software, and came up with this pattern for a quilt:

I needed to add just a few fabrics from my stash to have enough for a quilt top.  

The basic block is just one long rectangle and 2 squares, separated by white sashing.

The best part was playing with putting the fabrics up on the design board:

It looked a little chaotic at first glance, but when I added in the white sashing, it all worked out nicely.  Here is the completed top:

I might add an outer border, but it will have to wait until I can shop again at the fabric store, whenever that might be possible.

Saturday, September 26, 2020

Rainbow Wrapup

Last year, I participated in the Rainbow Scrap Challenge but never got around to posting my finished quilt tops.

Each month, I made six Birds in the Air blocks and one Crumb block from the chosen color.

Eventually I had quite the rainbow of "birds".

I chose primary colored blocks and made this arrangement:

I added a bright border containing all the colors and the finished top looked like this:

Here's a closeup of the border fabric:

I still had all the pink/turquoise/fuschia blocks to work with, plus some extra primary colored birds so I put them together in a second quilt top:

Here is the border fabric I used for that one:

I was fortunate that both border fabrics were acquired for only $1.00 a yard at my quilt guild's yard sale last year.  Both quilt tops are child sized and were donated to my local chapter of Quilts for Kids.

I still had all the Crumb blocks to play with:

I decided to put them together in a wonky setting:

To get the wonky look, each block is sewn to asymmetrical borders, which were cut from rectangles of a splashy paint print fabric.

Here's an example of the pink block:

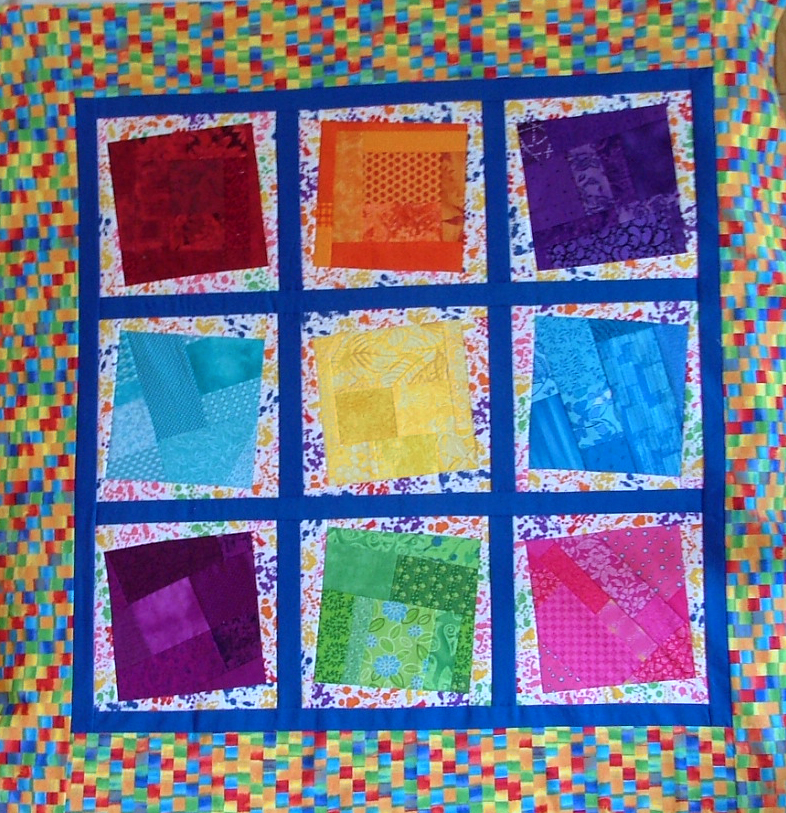
I ended up with this youthful quilt top:

In the end, I'm not crazy about it.  I would not have chosen the bright blue sashing if I had been working at home, but I sewed this together at a quilt retreat and the blue sashing was what I had with me.  However, I think a child will find it a fun distraction to cuddle under, so it was donated to Quilts for Kids as well.

Thank you , Angela, at Soscrappy for hosting another year of the Rainbow Scrap Challenge.  You can see what other scrappy creations are being sewn up for the Rainbow Scrap Challenge 2020 over at the link-up here.

Monday, February 25, 2019

Two for one

A while back, I purchased a bunch of fat quarters in a clearance sale.  I had no plan in mind, but the price of about $0.80 each was too hard to pass up, so I just picked up some coordinating colors.

They sat on my shelf (for close to a year, I think)  while I waited for inspiration to strike.  Inspiration came when I found the perfect coordinating fabric that combined all the colors:

The plan was to make a strippy quilt using the floral fabric to tie it all together.

I cut strips from each of the fat quarters, but I also needed strips of white fabric to sew in between them.  This was another time when my Stripology ruler was the perfect tool for the job:

You lay the slotted ruler down one time, make several cuts at once, and when you remover the ruler, you have all your strips cut:

Next step was to sew a white strip to each of the colored strips.
Strip noodles anyone?

I lined up the white/fabric strips on my design board until I got an arrangement I liked:

This was looking nice, but would not be wide enough for a kid's quilt, so I went back to the beginning and created a second set of strips:

Now the resulting quilt would be too big.  Just like Goldilocks, I needed to find the combination that was just right.  I cut one set of strips in half,  and then  I liked the proportions.

I sewed it all together, and added more floral fabric to make a border:

But...what to do with the leftovers from the strips I cut in half? That was easy, make a second quilt! I cut a 3rd set of strips from my original fat quarter bundle, added the white strips and created a second quilt.

I did not have enough of the  floral fabric left for a border on this one so I just made the outer white borders a little wider.

When all was said and done, I had two quilt tops to donate to Quilts for Kids. 😄

With the leftover bits, I cut out some squares for the upcoming months of the Rainbow Scrap Challenge.  Being only 2 months into the challenge, we have not done aqua, green or blue.  I've got a head start!

post signature

Sunday, July 29, 2018

Even the leftovers have leftovers

I found myself left with a rainbow of colorful scraps after I finished my Dinosaur quilt.

I knew there had to be at least one more kid's quilt in that pile.  What's a gal to do but invite a few friends over and have a sew day?

I cut out as many 3 1/2 inch squares as I could from the pile:

Then I sewed them up into four-patch units and alternated those with plain white squares:

The last step was to find a border fabric. Turns out  I had a rocketship fabric that contained all the same bright colors:

A narrow inner border of blue and a wide border of the rockets resulted in this cute quilt top:

With 3 of us sharing just one ironing station, it turned out to be the one place where a bit of a traffic jam could take place.  (Not that we minded the chance to take a break and chat while we waited our turn..  It was more like we didn't want the person at the iron to feel rushed.)  Anything that could economize on the use of the iron was handy.  So, I came up with a plan to sew the two borders onto the quilt with only 3 trips to the ironing board instead of 4.

1:  Sew top and bottom inner borders to center of quilt.  At the same time,  take remaining 2 inner border pieces and sew them to two of the outer borders pieces.    Iron quilt and also the border pieces.

2:  Sew left and right borders to quilt.  Iron.

3:   Sew remaining outer borders to top and bottom.  Iron.


I had lots more colored squares and enough rocketship fabric to make a second quilt top.  I forgot to get a photo of the finished top before I turned them over to our Quilt for Kids coordinator, but here it is what it looked like in progress.

Oddly enough, my pile of rainbow scraps doesn't look much smaller, but that only means there are more quilts to come.

post signature

Thursday, July 5, 2018

Child's Play

One way to beat the heat is to stay inside and sew.  I had yet one more panel that I wanted to turn into a small donation quilt.  It was this rainbow bright dinosaur print:

I also had a small amount of a coordinating dinosaur print:

I cut up the panel into smaller pieces, and fussy cut some of the dinosaurs from the coordinating fabric:

I pulled an array of bright colors from the stash, and added some fabric frames to the fussy cuts:

Now it was time for the real fun to begin.  I started with the top row and set it out next to my machine:

I played around with some randomly cut strips and got an idea of what I wanted the finished row to look like:

Then I just started joining adjacent pieces, and trimming off any excess as I went along.  Eventually, the top row looked like this:

I did the same thing to the next three rows:

All that was left was to sew the rows, square up the side edges and add some borders.  Here it how it ended up.
The edges are droopy because they extend beyond my little design board, 
but I assure you they are flat. 

I had such a fun time putting this together.  And all the while, I had steak tips slowly simmering in the crockpot and potato salad cooling in the refrigerator.  Not exactly your average Fourth of July, but I'll take it.


post signature

Friday, June 29, 2018

One panel = Two quilts

Here is the panel I started with:

and here is what was left of it  after making the "Tutu Fairy" quilt described in my previous post:

I knew that there was another quilt hiding in there somewhere, and I still had a yard of fabric printed with small castles:


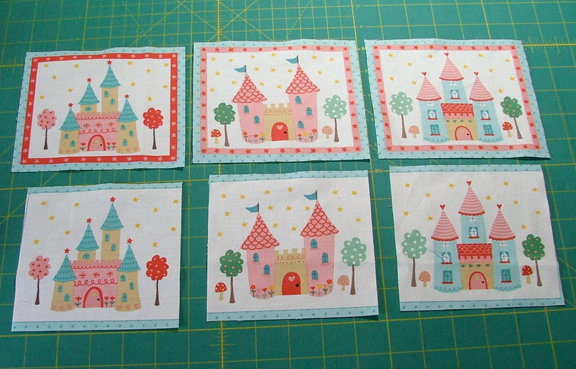
With castles being the main theme, I started with the six castle blocks in the panel:

I liked the narrow borders of red and pink on the top row, so instead of trimming them off to match the size of the castles in the bottom row, I decided to add narrow borders to the castles in the bottom row:

My red and pink fabrics were not perfect matches, but I think they did the trick:

Now that I had the castles figured out, I did the same border treatment to the last four panel motifs:

Then I turned my attention to the star strips:

They were not long enough to use as is, so I combined them into two longer strips, and added multiple narrow strips to widen them a little bit:

Now I had all the ingredients to sew up a small quilt:

The coordinating castle fabric made the perfect border.  Here is the before and after:


post signature