Showing posts with label Fix it. Show all posts

Friday, April 22, 2011

Saved by the batik....

You know that feeling of satisfaction you get as you sew the last seam of the last border on a quilt?  Imagine how quickly it fades when you start to iron that last border and you see this:


Yes, loyal readers, that was the front side of the quilt!

The tedious task of removing the entire border and sewing it back on again with the correct side facing up seemed to by my only option.

But then, I realized I had another option afterall. 

I removed just the offending part of the border from the rest of the quilt.

Rrrripped out the  seam in the border where the two fabrics were joined:


And  re-sewed the seam with the seam allowances on the other side this time.


Then I just re-attached the border to the quilt and no one will be the wiser.  (except of course for you, dear readers, but you won't snitch, right?)


Of course, this trick only worked because the border was a batik fabric.

I'll post a photo of the full quilt top when I can spread it out and get a good shot.   Until then, I just needed to share this experience with people who I know would appreciate it.


post signature

Monday, January 10, 2011

To fix or not to fix…

I’m working on making a sample for the quilt shop.  It’s an awesome pattern called “Twister” by Debbie Tucker, and I will be teaching it as a class when I am done.  I’ve been rushing a bit because of a deadline, which means I’ve been piecing past my bedtime, which inevitably leads to mistakes. 

Here is an EQ6 rendering of what the quilt is supposed to look like:
Twister Awesome, right?

And here is what mine looks like:
Twister mistake
Look carefully.  The mistake is in the pieced borders on the right and left side.  I should have rotated the blocks another 90 degrees before I sewed them together.  Gah!

Here is a side-by-side comparison.

 I don’t have the time to rip out all those stitches and re-do them, so I’m going to have to go ahead and display it as it is. In the one on the right, the two long pieced borders merge into the solid navy outer border.   Do you think the overall design suffers too much from my error?

Friday, December 3, 2010

Lefty Lament

I'm a left handed person.  There.  Now you know.

Actually, I write with my left hand which makes me a lefty, but I actually do a lot of other things with my right hand.  For example, I knit like a right-handed person because my right handed mother taught me that way.  I also throw a ball with my right hand, and bowl with my right hand. 

This either-handedness (is that a word?) comes in handy when I'm rotary cutting.  I can cut with either hand.  That annoying first cut to straighten the edge before cutting a strip to size is not a problem.

So, where IS the problem?

Well, I've started writing some instructions for a quilt class and I realize that my left-handedness might be an issue.  For example, take a look at this photo:

In my lefty world, that is how I would draw a line...ruler in the right hand, pencil in the left.  But I realize that would be backward to most people.

This photo is part of a step by step guide I wrote for mitering corners, and until I looked at this photo, I didn't realize that the whole way that I miter corners is probably backward to a right hander.  So, do I retake the series of photos to show the process  all in the opposite direction, or do I just assume my students will make the adjustment on their own?

I'll have to think on this a bit, but I would really welcome your input.

post signature

Saturday, July 3, 2010

New life for an old stitchery

photo album_001 My mom is an accomplished knitter, but she did try her hand at stamped cross-stitch once.  She made a pillow from a kit.  The cross-stitching was done with yarn, which may be why it appealed to her.

The pillow was finished back in the 1970’s sometime, and was part of our family room decor for years.  Naturally, a certain amount of wear and tear was endured until my mom finally put the pillow away.

When my folks were downsizing their belongings in preparation for their move, we found the pillow.  Years in the attic had not done anything to improve its appearance.  It looked tired.  Mom was reluctant to part with her handwork, but she knew  the old pillow had served its purpose and that there was no place for it in their new home.

My fast-thinking sister took a pair of scissors, cut away  the cross-stitched portion of the  pillow top, and  quickly stuck it in her bag without my Mom seeing it.  She brought it home and gently hand washed it.  The colors were renewed, and the background fabric shed it’s coat of dust.

My sister gave me the stitchery to see what I could do with it.  This is what it looked like when I got it:
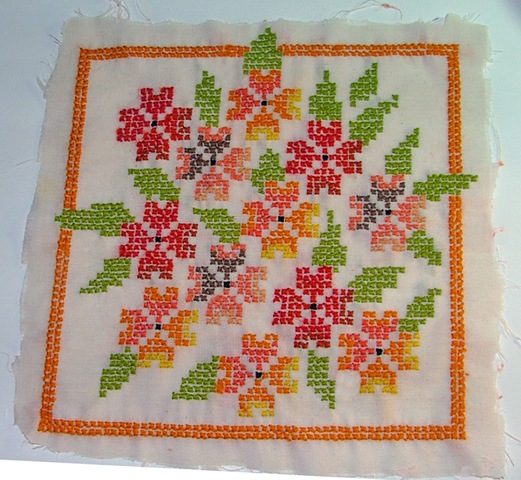
pillow before

And here is what it looks like now:
pillow after
I found an apple green fabric in the home dec department that really gave a fresh look to the colors. Then I sashed it like a quilt block, popped in a brand new pillow form, and gave it a fresh start.

We are going to give it to Mom at her upcoming birthday.  I can’t wait to see what she thinks.


Today I am grateful for:
      A quick thinking sister who saw the possibilities in my Mom’s handwork.

Saturday, April 24, 2010

Sewing Box facelift

In my last post I showed you this sewing box and the vintage buttons it contained:
Sewing box
After the buttons and notions were removed, I found that the satin lining of the box had ripped away from the bottom in a few places.
Sewing box damage

You can see that behind the satin lining is actual wood which is something you don’t see in a modern sewing box.
Damage detail

I didn’t think I could repair the existing satin, so I went to my local JoAnn’s and bought some co-ordinating ribbon and fabric:
ribbon and fabric

With a lot of patience,  a challenge to my dexterity and some ribbon and glue, I managed to connect the sides of the satin lining to the bottom.  Then I created a new bottom by covering some cardboard with lightweight batting and the fabric.  Voila!
repaired

My Great Aunt Florence's vintage sewing box lives on  to carry the sewing notions of a new generation.   Granted, I will be very careful not to overload it with buttons this time around.