Saturday, July 28, 2012

I finished the block I posted about yesterday.  All 68 pieces. Whew!

I don't think it has ever taken me 2 days to complete one block before.  One thing that was slowing me down is that the illustration of the block was a black and white drawing.  I had to keep referring back to the instructions to figure out which was "Fabric 1" etc

Eventually, I sat down with my trusty Electric Quilt software and drafted up a block in color to use as a guide.

Things went much smoother after that.  (I must remember to take a photo of the sample she shows us in class from now on!)


******************

Sat down to watch the Opening Ceremonies of the Olympics last night, and planned on getting lots of knitting done.  I'm still working on the sweater for my son, and the time had come to rip out several inches of the front of the sweater due to an error I made in the cable stitch.

I discovered the error back in May, but I didn't have the heart to pull out all that work at the time.  I hoped that if I ignored it long enough it might magically disappear, but the knitting elves were busy, I guess.  Anyhow, I made it my goal to get the sweater finished by the time the Olympic Games are over.

So, as I said, I sat there watching TV for a couple of hours last night, but I had trouble getting back into the pattern.  I knitted and un-knitted the same few rows a bunch of times, and ended the night exactly where I started. 

I hope the US Olympic team has better luck!

post signature

Friday, July 27, 2012

23 Geese a-laying

This is what I have done so far for this month's  Saturday Sampler BOM:

That's only about half of the number of Flying Geese units needed for this block.

The technique we learned for making the Flying Geese blocks involves using a new ruler that we all got in our introductory block.  It's called the "Quick Trim and Circle " ruler from Creative Grids.   The "Quick Trim" technique is used for making the Flying Geese.

There are lots of different ways to make Flying Geese, and everyone has their favorite, but since this is a new one to me, I thought it worth a try.  The biggest advantage I can tell, is that you don't have to draw a diagonal sewing line on the back of the squares.

Here's an overview of how the ruler is used, primarily because I want to add these photos to my blog so I can refer back to them again next month.  

Start with a square and a rectangle.

Place the square on top of the rectangle, right sides together.
Look, Ma!  No  diagonal lines!

Line up the crosshair lines on the ruler and cut.  (The lines are hard to see in the photo.)
 Bring the unit to your sewing machine, and sew a 1/4 inch seam along the edge you just cut.  Then open it out and press.

Do the same to the other side.  Cut. Sew. Press.

Now you have your Flying Geese unit.

For a stack of Flying Geese, you sew the next fabric to the top of the unit like this:
and start over again.

Pretty neat, once you get the hang of it.  When you are just learning how to use the ruler, you may end up with this:

So the next time, you concentrate really hard on getting the angle right, but forget to check that the fabrics are right sides together.
Hard to tell, but the top left corner had to be removed and turned over to the right side.

The downside to doing a BOM from a quilt shop is that if you goof up with fabric, you have no more yardage to replace it with.  I really liked that turqoise fabric with the black swirls, but I had to substitute a fabric from my stash when I cut it the wrong way.

The upside to doing a BOM is that you can make a labor-intensive, 68-piece block just this one time and never have to do one again.

post signature

Thursday, July 26, 2012

The fashionable chef


As part of her developing cooking skills, my daughter has discovered that an apron is a very handy thing to have.  I had no idea she thought  this, until we were in a kitchen store and I found her admiring this cute apron.

Together, we decided that I could make her one.  (Follow that logic?)

The next day I was in the quilt shop to pick up my Saturday Sampler block and it was the perfect time to pick out some apron fabric, except that my daughter was not with me. 

However, I had a good idea of what colors she likes, so I took some pictures of fabrics on the bolt and texted them to her.  My goodnatured friend Linda was with me, and the two of us went all around the shop, picking likely fabrics and getting my daughter's opinions via cell phone.  It was quite comical actually.

Eventually, we decided on these two fabrics:

The idea was to use the floral fabric for the apron, and the turquoise fabric for the trim.  In the end, I used an equal amount of both and made a reversible apron.

I didn't have a pattern, so I started with a basic barbeque style apron that we already had at home and drafted a pattern from that.

Then I put the pattern over both fabrics and cut them out at the same time so the pieces would be the exact same size.

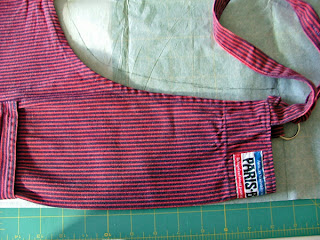
Making the ties was easy enough to figure out, but before I could sew it together, I needed to figure out how to make a pocket.  We did not want the one central pocket like the barbeque apron.  We wanted something a little more cute.

It took a bit of trial and error, but in the end I came up with this:

(I plan on posting a tutorial on how I made the pocket, if anyone is interested.)

To make the adjustable neck tie, I used a pair of D-rings from the fabric store.  I also added a bit of batting inside the neck strap.  (Hey, I'm a quilter first, right?)

Here's the finished apron:

The reverse side looks like this:

Happy Cooking!


post signature

Tuesday, July 17, 2012

Sunglasses required

This weekend I picked up the next 2 blocks in the Saturday Sampler BOM.  The fabrics for this month are really bright.

These are the fabrics I will be using
to make this block:


The weather is scorching hot outside, and its a good day to just stay home and sew.  It's also a good day for ice cream, and there's been no lack of that around here.  My daughter got an ice cream maker and has been trying out recipes.  The first one was a maple fig ice cream, with a maple sauce and topped with walnuts:

A few day later it was cheesecake ice cream with blueberry sauce and a vanilla wafer crumble:

Not to be outdone, the next night my son made a chocolate chiffon pie with a fresh fruit topping:

Why did they pick the week I need to go for my cholesterol test to make these fabulous desserts?  Tonight we are switching gears and having homemade watermelon sorbet. Can't wait.
post signature

Saturday, July 14, 2012

Quilter's Nail Polish


It's what all the cool quilters will be wearing this season.
post signature

Friday, July 13, 2012

Granny needs inspiration

I have finished quilting the interior of my Valentine for Granny quilt.

I'm happy with what I have so far, but am stumped as to how to quilt the outer white border.  Before doing anything, I have to take out all the basting pins and redo the basting in the border.  All the straight line stitching has shifted the center a bit and you can see that the borders no longer lay flat, particularly the one in the top of the photo.

It's a smallish quilt so no big deal really.  Just have to get inspired to do it.

At the risk of losing all my quilting credibility, I'm going to share with you a little tip I have used for the occasional "oops!", where the white quilting thread ended up on the red fabric:

Yup!  It's a Sharpie.  Here is a "before" photo:
and here is the "after":
A few light touches with the red Sharpie on the white threads made the stitches blend in.  This is quite a magnified view I've shared.  Here is an overall view of the same block:

Just keepin' it real here, folks.  Just keepin' it real.

post signature

Thursday, July 5, 2012

Granny gets basted


The holiday yesterday gave me some leisure time in the afternoon for quilting.  I pulled out the Granny Square quilt top and got it basted.


I decided the best way to show off the pattern was to quilt around each of the squares in the block.  

I found that the best method for stitching in the ditch around each square was to first quilt around the nine-patch in the center, and then quilt the two long rectangles that make up the "X".
I've got 8 out of 12 blocks quilted so far, and then I have to decide how to quilt the rest.

post signature

Wednesday, July 4, 2012


Happy Fourth of July!


post signature