Tuesday, December 30, 2014

2014 The year of the shawl

I have completed 3 more shawls for our Prayer Shawl Ministry.  This first one was called the "Veil Stitch" shawl:
The pattern itself was not hard to follow except that it was a repeat of 4 rows which were very similar to each other.  I had to keep a row counter going and check at the end of each row to be sure I was on the right one.  Overall, it does have a lacy look, like a veil:
This one was given to a Dot, a lovely member of my quilt guild who has been having trouble with her eyesight.  She sent me the sweetest note of thanks, along with a little, handmade needle case.  Of course I was not expecting anything in return, but that's just the kind of lady Dot is.

After the veil challenge, I wanted to work on something a little less intense, so I made this blue shawl:
The blue shawl was crocheted lengthwise, and had only two rows which were repeated.  I like how the bottom edge had a built in scallop to it.

I also made a knitted shawl:
This pattern for this shawl was originally for a baby's blanket with a vertical stitch pattern.  I adjusted the size to make a shawl, and added some purl rows spaced evenly throughout to give it a plaid vibe:
I'm not crazy about the way the edges roll a bit, but I hope that blocking it will help ease that out.

I'm very thankful that one of the women at my church started up a Prayer Shawl Ministry this year.  I know that I have benefited greatly by being a part of it, and by getting to know the other ladies who are also members.  I look forward to continuing into the new year.

Prayer Shawls 2014


post signature

Monday, December 29, 2014

Tea With Friends


At our annual quilt guild Christmas party, my friend Rosemary gave me a cute quilt kit for "Tea Leaf Ornaments"

The finished ornaments, as pictured on the pattern, reminded me of Cathedral Windows, although I have no idea if they are similarly constructed.  Anyway, it was a new-to-me technique, so I decided to have a little fun and give it a try.

You start by folding the red and green squares on the diagonal,  with wrong sides together:

Next, you place a pair of the folded squares on top of a plain square,

and sew baste the triangles to keep them attached:

Then you use the squares as you would use any other fabric squares and make pinwheel blocks:

When you open out the folded edges,  it reveals the plain fabric underneath:

Then came the tricky part.  You need to sew the folded edges down so they will stay open.  I tried pinning first:


I could see there was trouble ahead, trying to maneuver around those pinheads.  Then I remembered that I had a fabric glue stick:


Surprisingly, it worked like a charm, and held the folded edges nicely while I sewed them down.  In retrospect, I should have used invisible thread for that part of the sewing, but I didn't have any on hand and I wanted to keep going.

The pattern was for making tree ornaments, but I decided I wanted a mug rug instead.  By adding a couple of fourpatch units, I would end up with a nice size.

A little light quilting, and then all it needed was a binding.  While I was in the mood to try new things, I decided to try a technique I had read about where the backing gets folded around to the front to make the binding.  It starts out looking like this:

and ends up looking like this:

That particular binding technique is probably better suited to a larger project, but in a pinch, it was fine.  All that was left to do was make up a nice cup of tea and enjoy my new mug rug!

The tea I chose was also a gift from the party.  My friend Linda gave me a tin of Downton Abbey English Rose tea.  The rasberries in the tea give it a lovely red color, just right for the season.

Speaking of seasons, season 5 of Downton Abbey is just around the corner.  Looks like I'm prepared, how about you?


post signature

Saturday, December 20, 2014

Friday night progress

I did my best to do some sewing on Friday night.  It was fun to think that others who were participating in the Friday Night Sew In were also working along in their sewing space.

I started with these two fun fabrics, and the intention of making a reversible  apron for a Christmas gift.

I got the pattern pieces cut, and the pockets made:

I even got them both sewn onto the apron fronts

At some point, I realized that I forgot to buy a set of "D" rings for making the neck strap.  I was going to keep going up to the point of making the neck strap, but then the lightbulb in my sewing lamp blew out and I didn't have a replacement for it.

I decided that fate was telling me to move on to something else, so I went downstairs, plopped myself down into my recliner with a cup of tea and finished knitting this:

It's a lap robe for a man.  At our last Blessing of our Prayer Shawls, a woman came up and asked us if we might have a men's lap robe.  We don't normally do lap robes, but decided to make one for her to give to her father.


It's a simple garter stitch with a few stripes, made with chunky yarn and size #15 needles.  It worked up quickly, and I am so glad to have it ready for her to give to her dad.  It kept my own lap nice and warm as I  worked on it, so I know it will work for him.

I'd say that the Friday Night Sew In was a success.  On today's shopping list is a pair of "D" rings, and a package of 60 watt bulbs!


post signature

Monday, December 15, 2014

Clock is ticking...


Time is getting shorter and shorter to get some Christmas sewing projects done.   Whatever doesn't get done this week, is what I will be working on this Friday Night during the Friday Night Sew In.


Wendy at Sugarlane Designs is hosting this virtual get together on Friday December 19th.  Won't you join us?

Tuesday, December 9, 2014

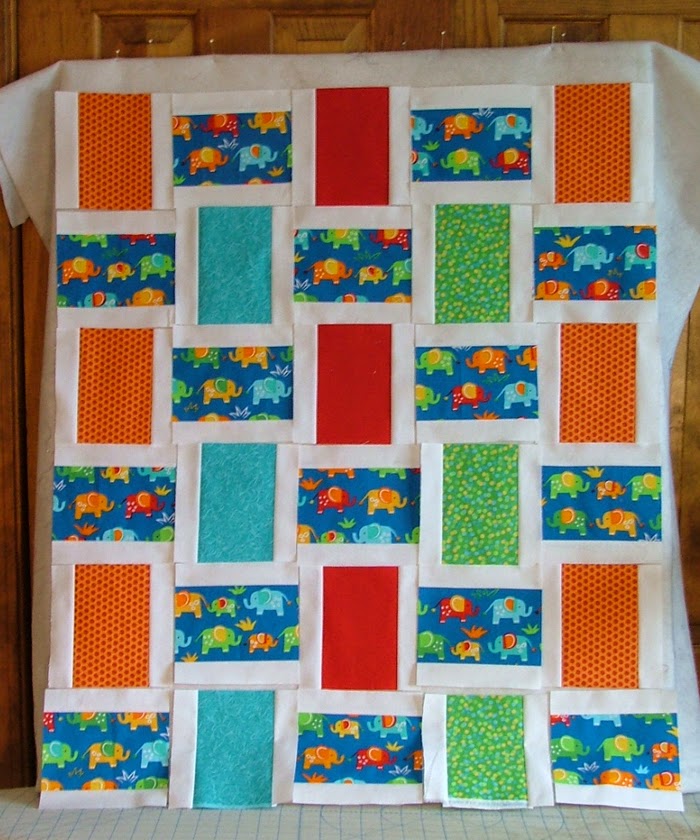
Baby Elephant Walk

Here's my formula for a quick and easy kid-sized quilt:

You need about a yard of a focus fabric, about 3/4 yard for sashing, and 5 fat eighths of complimentary fabrics for vertical stripes.

I chose this cute elephant fabric for my focus fabric:


To begin:
Cut 5 strips 4 1/2 x 20" from the focus fabric
Cut 1 strip 4 1/2 x 20" from each of the 5 fat eighths,
Cut 10 strips 1 1/2 x width of fabric for the sashing.  Subcut those into twenty 1 1/2 x 20" strips.


Sew a narrow sashing strip to both sides of all the wider strips:

Subcut the sewn strips into 6 1/2" squares:

Arrange the blocks, 5 across by 6 down,  lining up the strips for a woven effect.

Sew together row by row.  Add a 1 1/2" inner border of sashing fabric, and a 4" outer border of focus fabric:


And your quilt top is done! Size of the finished quilt top is 40 x 46", a great size for a kids quilt.
post signature

Tuesday, December 2, 2014

A year in the making


Over a year ago, I signed up for the Saturday Sampler at my local quilt shop. It's a 12 part monthly program.   Each month we were given fabrics and a pattern for one block.  If you complete the block and bring it to the next month's meeting, you get the next month's fabric and pattern for free.  Great motivation to keep up with the blocks!

The layout of the final quilt is a mystery, but as each month went by, a pattern seemed to emerge.  Each of the blocks was roughly based on a "Depression" block which looks like this:

At the end of 12 months, we had 12 blocks. 

It was fun to be working with so many Kaffe Fassett inspired fabrics. I had never worked with his bright bold fabrics before.

For the sashing, I decided to accentuate the effect of circular motion in each block.  Using Electric Quilt software, I came up with this setting:

Calculating the sashing was a bit of a challenge.  I needed long and short units,
mirror image units,

and also some picket fence units:

Eventually, I got it all sorted out, and the finished quilt looks like this:

I had the top quilted at my local quilt shop.  I love the way the spiral quilting accentuated the circles.   I gave the finished quilt to my daughter who had admired some of the early blocks when she saw me working on them.   The modern style, and the colors were just perfect for her.


post signature

Sunday, November 9, 2014

A hundred and one pounds of fun....

A few years back, I won this Honeybun as a door prize at our quilt guild meeting.

The colors are bright and cheery,  so I thought it would make a good Quilt for Kids.  I didn't know how much yardage to expect from a Honeybun, so  I started out by just sewing  the 1 1/2" strips into long panels and then decide where to go from there.

I added a narrow stripe of white to the outer edges of the panel and subcut them into smaller blocks:

Due to a miscalculation on my part, I subcut some of the panels smaller than the others, so I beefed them up by sewing white strips to the opposite sides.

I ended up with enough blocks to make two kid sized quilts.  My first thought was to make them exactly the same, alternating both of the blocks:

Then I decided to separate the two types of blocks and make two similar but different quilts.  The first quilt would be mad up off  all the strip blocks:

The second quilt would be made up of all the square blocks:

For a border, I found this fun pink floral stripe from the bargain bin at my local quilt shop:

I had just enough solid blue fabric in my stash for one inner border,

and just enough solid pink for another inner border for the second quilt:

Here are the finished quilt tops together.

In the end, the Honeybun had enough yardage for two kid sized tops.

Give yourself 10 virtual points if you know what the title of this blog post has to do with the rest of the content.  :-)


post signature