Cameras are a blogger's best friend for documenting the various steps and the finished projects of our quilting endeavors.

But, aside from the standard uses of taking pictures to share with friends, I have found many other times where having a camera in the quilt room has helped me with the quilting itself.
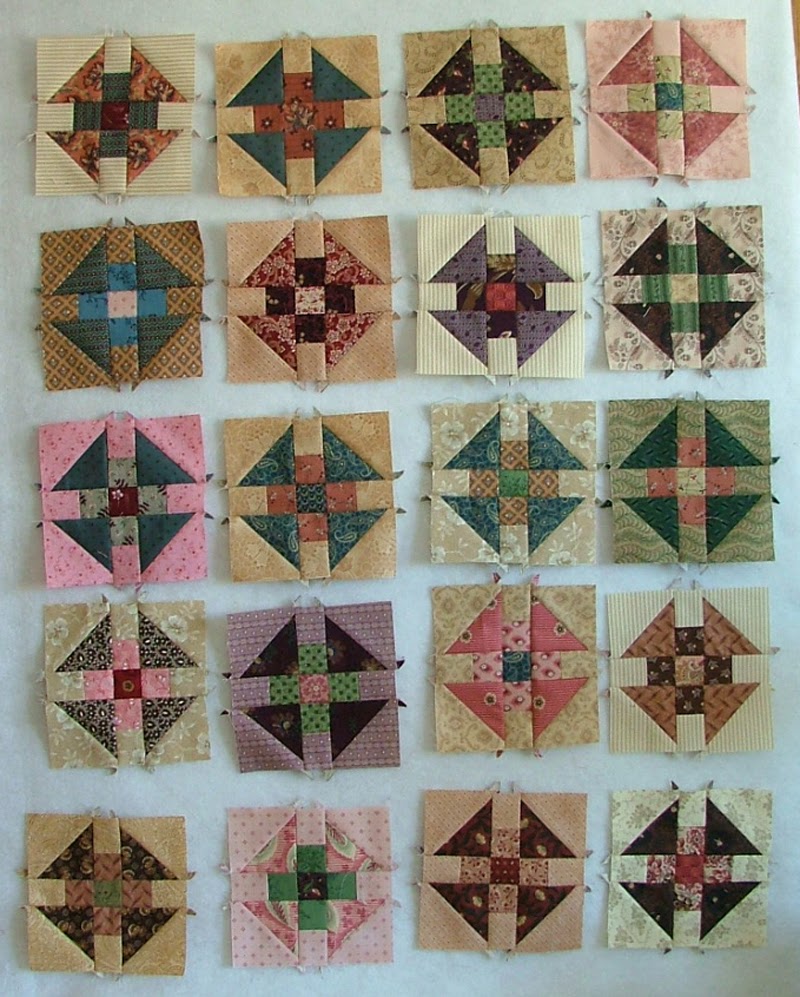
One of the handiest uses of my camera is to take a picture of my blocks when they are arranged the way I want them in the final quilt. The photo(s) serve as a placement diagram while I sew them together. Here are 20 Monkey Wrench blocks in the order I wanted to sew them together. Having a photo to refer to as I sewed the rows and columns together helped to keep me from mixing them up.
For another example, this "Ring Around" quilt did not have a simple row-by-row assembly. Marking it with row numbers and column numbers would have been impossible.

I took a photo of the blocks as they were arranged on my living room floor. Then I drew lines on the photo to show how the quilt could be broken up into quadrants that were easier to sew.

I sewed each quadrant at a time, using the photo as a guide, and then referred to it again to sew the quadrants together.
I also use my camera to audition fabrics. In this example, I was trying to choose a border design. I took a picture of each possiblity, and then could look at them all together.

On larger quilts especially, it can be hard to see the overall effect until seen through the eyes of a camera lens. I wanted to add appliqued flowers to the border of this Pineapple Blossom quilt, but wasn't sure where they should go. I placed some fabric squares in different areas of the border and took photos of each to decide where I liked them best:

There are also other ways that taking photos of works in progress has helped. When making a quilt using Granny Square blocks, for example, I took one photo of the back of a block to remind me which direction I wanted to press the seams.

Since I like to make scrappy quilts, my first decisions are which combination of fabrics will go together in each block. I take a photo of the groups of fabrics after I have chosen them. At the cutting table, I can rearrange the fabrics to make the cutting easy, knowing that I can refer to my photo put them back into their groups. For example, these four sets of fabrics

became these four completed blocks:

One last idea I would like to mention is using the camera to take a photo of a quilting technique, such as proper ruler placement of a ruler.

I was always the girl who took pictures, even before the digital age of cameras when you had to factor in the price of the film and the developing costs. With digital cameras, it is so easy, (and cheap!) to record anything and everything, so I thought I would share these ideas about how I use the camera in the quilt room.

These are great tips! I do many of them, but others, such as taking a picture of the back for the pressing, are new to me. Brilliant! I use the camera on my cell phone for many other things. I take a picture of the number where my car is parked in a large garage (like at the airport) so I remember where it is, I take pictures of a book someone may be reading that I want to remember, etc. It is better than note-taking! My all-time favorite picture tip has nothing to do with quilting, either, but applies to the upcoming festive season. I take pictures of my Christmas decorations so that I can remember how I had everything arranged. That way, if someone is there to help (like a husband) you can hand them the photo and say, "put everything the way it looks in the photo!) And they have no excuse not too! Brilliant!
ReplyDeleteI love that idea to take a photo of where you parked! I'm sure that will come in handy, thanks!
DeleteI started taking pictures of my blocks after you gave me that tip! Comes in so handy! Great ideas!!
ReplyDeleteI didn't know that! Glad you found it useful.
Deletewell thankyou for those tips! I must say, when I am looking for mistakes in my quilts, I find finishing, layering, quilting them, photographing and putting them on my blog usually shows the faults up nicely ha ha
ReplyDeleteI am not very good at seeing tone and I hit on the idea of photographing a selection of fabric, then opening the photo up in "paintshop" or the like. I select black and white, then somehow the tones seem more obvious to me.
Changing a color photo to black and white sounds like a great tip for showing just the values of the colors! I'm going to use that, thanks!
Delete