Sunday, August 26, 2012

Swiftly fly the yarns....

I bought a lovely blue hank of lace yarn in anticipation of my next project.

This was the first time I bought yarn that wasn't already rolled into a skein or ball, and I knew I had to tame it into something manageable before I could start to knit with it.  Thankfully, my knitting sister had just the equipment I needed:  a ball winder and a swift.
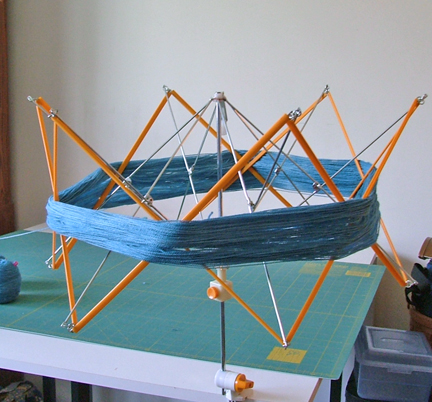
This is the swift:
Technically, it is an "umbrella swift" because it expands and contracts with the touch of a button like an umbrella.  You fit the hank of yarn around the swift and adjust the width to keep the hank in place.  With just a gentle pull, the swift rotates around, and the yarn unwinds.


This is the ball winder:

You feed the yarn from the swift, and around the spindle of the ball winder.  Then, by turning the crank, the ball winder turns and the yarn is collected on the spindle.  The result is a tidy ball of yarn that can be pulled from the center.

I found a great video on Youtube that showed how the whole thing worked, and felt pretty comfortable about giving it a try.

Things went very smoothly until I finished the first ball of yarn, and it was time to remove it from the spindle.  What I didn't realize was that as soon as the ball comes off the spindle, the center collapse into itself.  Oops!  Forgot to be sure to keep hold of the start of the yarn, and it disappeared into the center of the ball.

Searching around in the center of the ball to find the starting yarn resulted in a mess, so I decided to start again, and rewind the whole thing.  This time I tied a small bead onto the leading edge of the yarn, and taped it to the middle of the spindle for insurance.

When I removed the finished ball from the spindle, I knew that even if I lost the starting end of the yarn, that the bead would help me find it.

Now I have two cute little balls of yarn ready and waiting.  I am determined not to start the lace project until I finish the sweater I am desparate to finish determined to finish.

Wouldn't you be inspired by these cuties?


post signature

Friday, August 17, 2012

Dark Roast Nights


Sometimes it can be hard to find just the right fabric to make a gift for the men in our lives.  I was looking for some fabric to make my college-age son a pillowcase and everything I had seen was either too feminine or too childish, but this past weekend I found this manly coffee cup fabric at the quilt shop:

It's from a fabric line called "Espresso Yourself" by Wilmington Prints, and had a great coordinating fabric with names of coffees on it.

All it needed was a dash of Dark Roast Brown for an accent stripe and a fun pillowcase was born:

I wonder....If you sleep on a pillowcase made from coffee fabric, does the caffeine keep you awake?

post signature

Sunday, August 12, 2012

Quilters who knit

Who goes to a quilt show and buys yarn?
I do!  This is a pretty blueberry colored yarn that is 100% Merino wool, and so very soft to the touch.

I'm going to attempt my first knitted lace project with this lacy scarf:

(As my Mom pointed out, why didn't they have the model put her hair behind her back for the photo so we could see more of the scarf?)

The pattern I will be using is from Jane Austen Knits.
Jane Austen Knits is a very interesting magazine that features modern knitting projects that are inspired by Jane's books.  Included among the patterns were some very interesting articles including one called Dressmaking in Jane Austen's Time and another called Where Jane Lived.  

Of course, I have to finish the sweater I am working on first.  I figure that having this lovely lace project waiting in the wings will give me more incentive!
post signature

Sunday, August 5, 2012

Patch Pocket Primer

This is the tutorial on how to make a patch pocket for the apron I posted about last week:

The pocket is self-lined and has a contrasting fabric binding at the top. 

Materials:
              (1) 8 inch square pocket fabric
              (1) 8 inch square pocket lining fabric
              (1) strip of binding fabric, measuring 7 x 2 3/4 inches.
               Template (see below)

To make the template,  start with a piece of cardboard measuring 7 x 6 inches.  Mark a small dot at 3 inches down from each side.  Draw a curved line from the left side mark, to the center bottom and back up to the right side mark.  Or, use a saucer or dinner plate and trace a curve.

Place your 2 pocket fabrics right side together, with the template on top.  Trace around the template.  Cut out the pocket pieces on the line you traced,  and sew around the entire curved edge using a 1/4 inch seam allowance.  Leave the straight edge at the top unsewn.

Turn the pocket right sides out, and press.

To make the binding strip, start by pressing a 1/2 inch fold on the two short ends of the fabric strip, and then fold and press the strip along the long side:

Now you have the pocket and the binding strip prepared, but you can see that the binding strip is about 1/2 inch shorter than the width of the  pocket.  This is because I wanted create a little fullness in the pocket, to makes it more useful for holding something other than a flat recipe card.

Fullness is created by  gathering the top edge of the pocket.  The first step to gathering is to sew two rows of large (basting size) stitches along the top, close to the raw edge.

Gently tug on the bobbin threads in each row of stitches to create a gentle gather along the top edge of the pocket.

Gather enough fabric so that the length of the pocket is just slightly less than the binding strip.  Distribute the gathers as evenly as possible.

Place the binding strip onto the pocket, aligning the raw edges.  (If you are using a lining fabric that is different from the pocket fabric, pin to the lining fabric.)  Make sure the the binding extends beyond the pocket by about 1/16th of an inch. Pin.
Here is the other side.  See how the turqoise binding strip just peaks out at each edge?

Sew, using a generous 1/4 inch seam. Then gently press the binding strip away from the pocket.

Turn the pocket over to the right side, and fold the binding from the back over to the front, just enough to cover the row of gathering stitches. Pin.

Sew the binding to the front, using a narrow seam allowance. 

Now the pocket is ready to be sewn to the apron front.  Place the pocket into position on the apron front and pin.

Topstitch along the outer curved edge to attach the pocket and you are done.

I would love to hear from you if you use this tutorial, and would be happy to answer any questions about it.
post signature

Saturday, August 4, 2012

Square peg, round hole

The Saturday Sampler BOM that I am doing has two blocks to prepare each month.  The "Basic" block is the one I showed in my last post. I also finished the "Challenge" block this week:

This pieced block was made using the faux applique gluestick method I described in a previous post.  I started with this rail fence block and a large piece of the blue background fabric:

A bit of cutting and pasting, followed by careful sewing,

and the block was done.

I cannot think of an easier method to use to applique a pieced block.  It's funny to me that this month's "Basic" block was so challenging, and the "Challenge" block was so easy.

Here are the four blocks I have made so far:

My friend Linda is doing the same Sampler using the black and white fabrics. These are her dramatic blocks:
Can hardly wait to see the finished pattern for these sampler blocks!