
In the past, I often had a problem when it came to joining the beginning and the ending of the binding. When I was a beginner quilter, I used to just turn under the raw edge, and apply one edge over the other. It did the job, but it was bulky.
Later, I learned how to join the seams on the diagonal and create a nice, smooth join, but, I always had to stop and review how to do it, and more than once I joined them backwards and had to do it over.
Finally, I found an online tutorial at McCall's Quilting magazine and it changed the way I join bindings. Only thing is, I kept losing track of the website, so I decided to make a blog post about it.
The following is a step by step guide to how I join my bindings. It's basically the same as the McCall's version, but, being left handed, it is done in the opposite direction. This may not make any sense to anyone else but me, but from now on I'll always know where to find my directions.
You start by trimming one end of the binding at a 45 degree angle:

Open out the binding that you didn't cut, and lay it in place along the raw edge of the quilt. Pin.

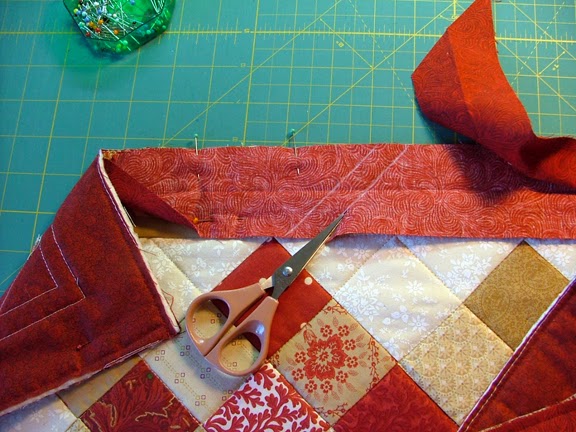
Trim off any excess binding. (I'm talking about that piece on the right that is folded down onto the quilt.)

Open out the binding with the 45 degree cut and lay it on the top of the bottom piece. (I put a piece of tan fabric in there so you can see there are two pieces.) Note that to keep from stretching the binding, I fold the edges of the quilt in toward the center.

Draw a 45 degree line on the bottom binding, following the cut edge of the piece of binding on the top:

Now you can lift up the top binding and you are left with a marked line on the bottom binding.

With your ruler, draw another line, a scant half inch to the right.

Cut the bottom binding on the line you just drew, as indicated by the scissors in the photo below:

Pin the two raw edges together:

Sew with a 1/4" seam, and finger press the seam open:

Refold, with wrong sides together, and pin the binding in place:

Sew the binding to the quilt.

Now you are ready to turn the binding to the back and sew it down.

Great info, I use the Fons & Porter Binding tool. It works for me, nice smooth finish.
ReplyDeletePatricia